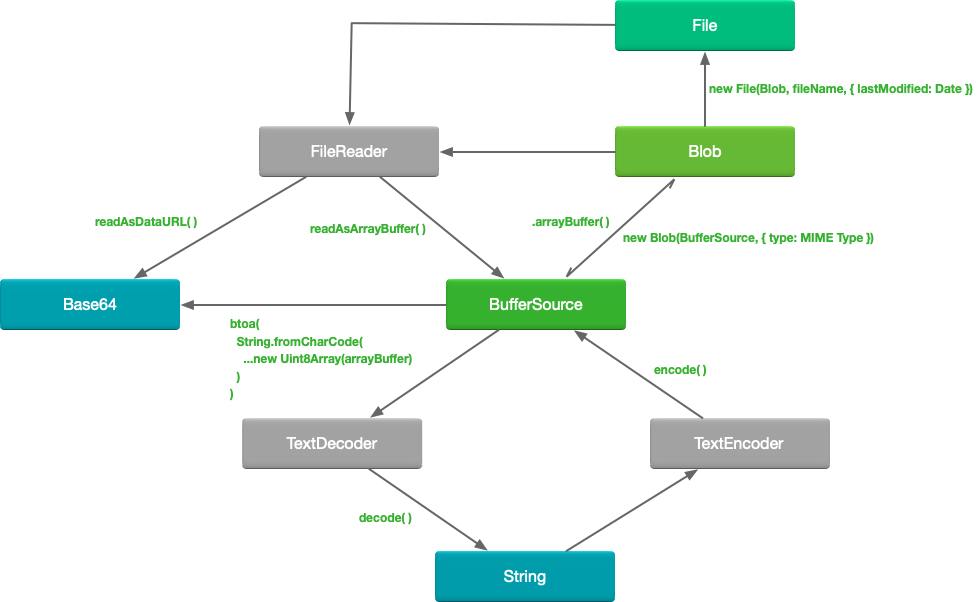
我们在开发过程中进行文件操作(上传, 下载, 创建)或者图像处理时经常会遇到二进制数据, 本文主要讲解二进制数据的基本概念以及常用数据操作.
BufferSource
ArrayBuffer
首先, ArrayBuffer 与 Array 的关系如同 雷锋 与 雷峰塔 一样, 不能说是一模一样, 只能说是毫不相干.
ArrayBuffer —— 二进制数组, 虽然名字也带数组这二个字, 但是它并没有像 Array 那样有较多的数据操作方法.常用的只有slice方法(用来创建一个新的副本).
ArrayBuffer 与 Array 的区别如下
- ArrayBuffer存储的是原始的二进制数据
- 它是对固定长度的连续内存空间的引用
- ArrayBuffer的大小等于其在内存中的占用空间
- 要访问单个字节,需要另一个“视图”(TypedArray)对象,而不是使用
buffer[index]
TypedArray
TypedArray 是用来创建一个ArrayBufferView以供我们使用像操作数组数据一样来操作二进制数据的一类对象(改变数组长度的方法无法使用)
TypedArray 是这一类对象的统称, 而并非是一个名字如此的真实构造器, 具体构造器类型列表请翻阅下方 构造函数类型列表
使用
下面TypedArray指代构造函数类型列表中的其中一个, 在不提供buffer的情况下, 构造视图的时候会自动创建一个底层的ArrayBuffer.
我们可以通过 TypedArray.buffer 来获取到其底层的二进制数据(ArrayBuffer)
new TypedArray(buffer, [byteOffset], [length])
new TypedArray(object)
new TypedArray(typedArray)
new TypedArray(length)
new TypedArray()
操作
// 创建一个长度为16的arraybuffer
const buffer = new ArrayBuffer(16)
// 将buffer当做一个32位无符号整数序列
const view = new Uint32Array(buffer) // [0, 0, 0, 0]
// 查看视图的长度
console.log(view.length) // 4
// 查看视图的字节数
console.log(view.byteLength) // 16
// 操作数据
view[0] = 1
// 读取数据
console.log(view[0]) // 1在我们使用TypedArray操作二进制数据的过程中可以随时转换成其他类型的视图进行操作.
比如, 我们可以将Uint16Array转为Uint8Array视图
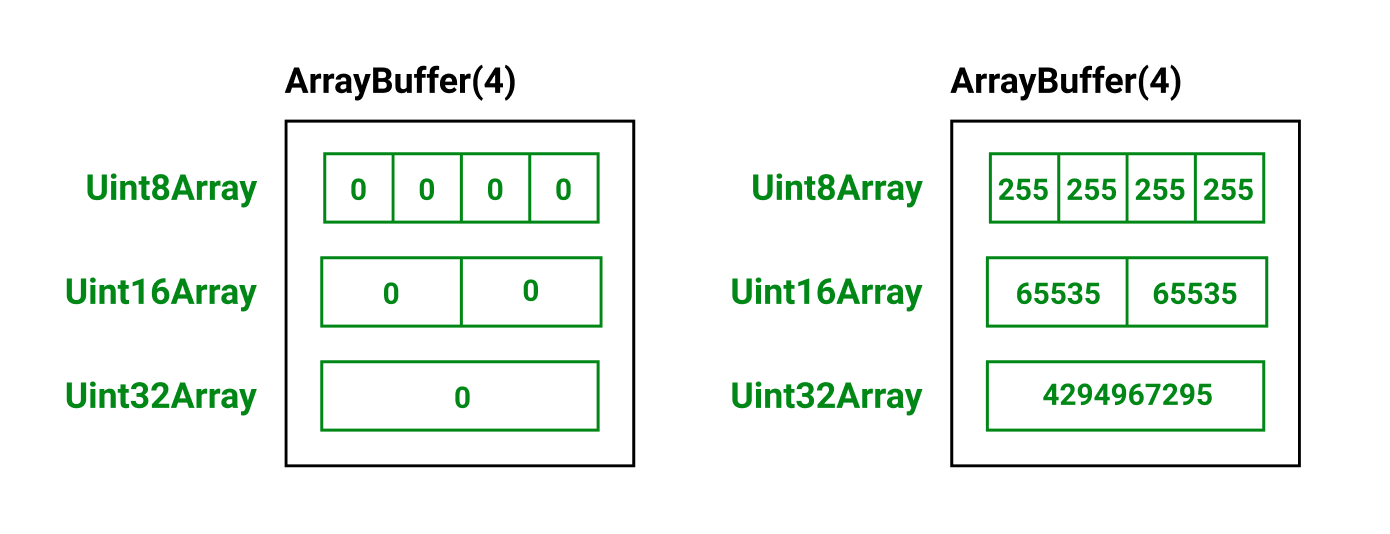
const buffer = new ArrayBuffer(4)
// 创建不同类型的操作视图
const v1 = new Uint8Array(buffer)
const v2 = new Uint16Array(buffer) // 或者 new Uint16Array(v1.buffer)
const v3 = new Uint32Array(buffer)
// 使用其中一个视图来操作
v3[0] = 4294967295 // 该值为Uint32Array单个元素的最大值
// 使用其他视图查看变更后的数据
console.log(v3, v2, v1)
// Uint32Array [4294967295]
// Uint16Array(2) [65535, 65535]
// Uint8Array(4) [255, 255, 255, 255]Uint8Array: 每个数组元素对应1个字节Uint16Array: 每个数组元素对应2个字节Uint32Array: 每个数组元素对应4个字节
当我们尝试写入超出类型范围的数值时, 会仅仅存储最右边的(低位有效)对应位数, 其余位数被舍弃
比如我们尝试使用 Uint8Array 写入 256
1. 256 对应二进制 100000000 (8个0)
2. 从右边起取8位,  1 | 00000000 , 为 00000000
3. 取 00000000 值进行写入
通俗来讲就是: 实际写入值 = 待写入值 % 28
特例: Uint8ClampedArray 写入任何大于 255 的数值都将会取 255, 写入负数则都将取 0 进行写入
构造函数类型列表(来自MDN)
| 类型 | 数组内每个元素的取值的范围 | 大小(bytes) | 说明 | Web IDL 类型 |
|---|---|---|---|---|
Int8Array | [-27 , 27-1] | 1 | 8 位二进制有符号整数 | byte |
Uint8Array | [0, 28 -1] | 1 | 8 位无符号整数 (超出范围后从另一边界循环) | octet |
Uint8ClampedArray | [0, 28 -1] | 1 | 8 位无符号整数 (超出范围后为边界值) | octet |
Int16Array | [-215 , 215-1] | 2 | 16 位二进制有符号整数 | short |
Uint16Array | [0, 216 -1] | 2 | 16 位无符号整数 | unsigned short |
Int32Array | [-231 , 231-1] | 4 | 32 位二进制有符号整数 | long |
Uint32Array | [0 , 232-1] | 4 | 32 位无符号整数 | unsigned long |
Float32Array | 1.2×10-38~ 3.4×1038 | 4 | 32 位 IEEE 浮点数 (7 位有效数字,如 1.1234567) | unrestricted float |
Float64Array | 5.0×10-324~ 1.8×10308 | 8 | 64 位 IEEE 浮点数 (16 有效数字,如 1.123...15) | unrestricted double |
BigInt64Array | -263 ~ 263-1 | 8 | 64 位二进制有符号整数 | bigint |
BigUint64Array | 0 ~ 264-1 | 8 | 64 位无符号整数 | bigint |
DataView
DataView 是一种灵活的数据操作视图, 它无需提前定义好视图的数据格式, 可以使用任何格式以及偏移量(offset)来操作数据.
语法:
new DataView(buffer, [byteOffset], [byteLength])构造函数与 TypedArray 类似, 不过需要注意的是, 当不传入buffer的时候DataView不会自动创建底层的ArrayBuffer
可以使用 getDataType() 的方式来使用目标格式来获取二进制数据. (注: DataType 指 Uint8, Uint16 等数据类型)
赋值可以使用 setDataType(index, data) 的方式进行
例如:
const buffer = new Uint8Array([255,255,255,255]).buffer
const dataView = new DataView(buffer)
console.log(dataView.getUint8(0)) // 255
console.log(dataView.getUint16(0)) // 65535
console.log(dataView.getUint32(0)) // 4294967295

dataView.setUint32(0, 0) // 将4个字节全部设为0
console.log(dataView.getUint8(0)) // 0
console.log(dataView.getUint16(0)) // 0
console.log(dataView.getUint32(0)) // 0附一份来自JS.Info的总结图

Blob
Blob(Binary Large Object) 相当于高级一点(有类型)的 ArrayBuffer, 它还可以按文本或者二进制的格式进行读取.

使用
构造函数:
const blob = new Blob(blobParts, options)- BlobParts:
Blob,BufferSource,String类型的数组 - options
- type: 文件类型, 通常是MIME 类型
- endings: 是否根据不同操作系统转换换行符, 可选值
transparent(默认, 不转换)或者native(转换)
例如:
const blob = new Blob(['demo'], { type: 'text/plain' })这样我们就创建了文本类型Blob对象.
操作
- 获取基本属性
const blob = new Blob(['demo'], { type: 'text/plain' })
console.log(blob.size) // 获取Blob的字节数: 4
console.log(blob.type) // 获取blob的MIME类型: text/plain, 未知的MIME类型将会返回空字符串""- 创建副本
Blob对象创建后是不可以改变的, 我们可以获取原Blob的部分或全部数据进修改来创建新的Blob. 比如使用 slice 方法来提取Blob片段
blob.slice([start], [end], [contentType])- start, end: 起始与结束字节, 与Array.prototype.slice类似, start可以取负数
- contentType: 默认与原Blob相同
- 获取BufferSource
- 可以使用
FileReader的readAsArrayBuffer来获取
const fileReader = new FileReader()
const blob = new Blob(['demo'], { type: 'text/plain' })
fileReader.readAsArrayBuffer(blob)
let buffer
fileReader.onload = () => {
    buffer = fileReader.resule // arraybuffer
}- 可以使用
Blob.prototype.arrayBuffer来获取
const blob = new Blob(['demo'], { type: 'text/plain' })
let buffer
blob.arrayBuffer().then(res => {
 buffer = res
})
例子
- 文件下载
function download (blob, fileName) {
  const url = URL.createObjectURL(blob)
  const a = document.createElement('a')
  a.href = url
  a.download = fileName
  a.click()
  URL.revokeObjectURL(a.href)
}
const demo = new Blob(['demo text'], { type: 'text/plain' })
download(demo, 'demo.txt')URL.createObjectURL(blob)方法接收一个Blob, 为其在内存中创建一个数据映射, 在点击下载链接的时候从内存中读取该blob数据从而实现下载.
每次调用createObjectURL方法时都会创建一个新的URL对象(即使引用的blob相同)
const blob = new Blob(['demo'], { type: 'text/plain' })
const a = URL.createObjectURL(blob) // "blob:https://lihowe.top/01a055e1-f32b-4a23-b636-0584cb200aa2"
const b = URL.createObjectURL(blob) // "blob:https://lihowe.top/2412515c-13d0-4c0e-9114-5703c74afe17"
console.log(a === b) // false注意: 该URL在使用过后其内存引用并不会被浏览器内存自动释放(因为浏览器不知道你到底用没用,或者之后还要继续使用), 所以我们需要手动对齐内存引用进行释放.
使用 URL.revokeObjectURL(url) 来取消内存引用, 这样浏览器就会在垃圾回收的时候对该引用部分的内存进行回收
如果我们不想时刻关注应该何时取消内存引用, 可以将Blob转为Base64, 然后使用URL.createObjectURL方式创建URL.
当较大的blob转换base64的时候性能会有损耗(base64编码后的字节长度增加导致的数据传输损耗)
const demo = new Blob(['demo text'], { type: 'text/plain' })
const a = document.createElement('a')
const reader = new FileReader()
reader.readAsDataURL(blob)
reader.onload = () => {
  a.href = url
  a.download = 'demo.txt'
  a.click()
}
File
首先, File继承自Blob, 可以说是一种特殊的Blob.
File在Blob的基础上添加了name 和 lastModified 属性.
常见地获取File对象的方式是通过<input type="file" >来上传文件获取
例如:
const textBlob = new Blob(['this is text content'], { type: 'text/plain' })
const file = new File([textBlob], 'file1.txt')
const file2 = new File([textBlob, new Blob(['another content'], { type: 'text/plain' })], 'file2.txt')
const file3 = new File([new Uint8Array([104, 111, 119, 101])], { type: 'text/plain' }, { lastModified: Date.now() })
FileReader
FileReader用于异步读取File(Blob)对象的内容
使用
构造函数:
const reader = new FileReader()常用方法:
reader.readAsText(blob, [encodig]): 将File(Blob)内容作为指定编码格式文本读取reader.readAsDataURL(): 读取File(Blob)内容, 并编码为Base64reader.readAsArrayBuffer(): 读取File(Blob)内容作为二进制数据(ArrayBuffer)reader.abort(): 终止文件读取
我们可以通过监听reader的状态来获取其读取结果, FileReader支持的监听有
- load: 读取完成
- error: 读取发生错误
- abort: 读取中断
可以通过 reader.onxxx = fn 或者使用 reader.addEventListener(xxx, fn) 来为reader添加监听事件
例子
- 获取文本文件内容
const textBlob = new Blob(['this is text content'], { type: 'text/plain' })
const textFile = new File([textBlob], 'demo.txt')
const reader = new FileReader()
reader.readAsText(textFile) // reader.readAsText(textBlob) 效果相同
reader.addEventListener('load', () => {
  console.log(reader.result) // this is text content
})- FileReader在同一时刻只能执行一个读取动作, 如果同时分别读取多个文件将会抛出异常.
const textBlob = new Blob(['this is text Blob'], { type: 'text/plain' })
const textBlob2 = new Blob(['this is text Blob2'], { type: 'text/plain' })
const reader = new FileReader()
reader.readAsText(textBlob)
reader.readAsText(textBlob2) // Failed to execute 'readAsText' on 'FileReader'
reader.addEventListener('load', () => {
  console.log(reader.result)
})
reader.addEventListener('error', e => {
  console.error(`reader读取文件错误, ${e}`)
})- 读取多个File(Blob)
const textBlob = new Blob(['this is text Blob'], { type: 'text/plain' })
const textBlob2 = new Blob([new Uint8Array([','.charCodeAt(0), 104, 111, 119, 101])], { type: 'text/plain' }) // ,howe
const textFile = new File([textBlob, textBlob2], 'demo.txt')
const reader = new FileReader()
reader.readAsText(textFile)
reader.addEventListener('load', () => {
  console.log(reader.result) // this is text Blob,howe
})
TextDecoder & TextEncoder
TextDecoder 与 TextEncoder 都是用来操作内容是字符串的二进制数据的, 一个负责编码, 一个负责解码.
TextEncoder
将字符串编码为二进制数据(Uint8Array)
构造函数
const encoder = new TextEncoder()默认创建一个以UTF-8编码格式的编码器, 构造器无参数
方法
encode(string): 将字符串编码为字节(Uint8Array)encodeInto(string, Uint8Array): 将字符串编码为字节, 并输出到指定Uint8Array中
例子
const encoder = new TextEncoder()
encoder.encode('lihowe')
// Uint8Array(6) [108, 105, 104, 111, 119, 101]

let u8 = new Uint8Array()
encoder.encodeInto('lihowe', u8)
// {read: 0, written: 0}
console.log(u8) // Uint8Array []

u8 = new Uint8Array(6)
encoder.encodeInto('lihowe', u8)
// {read: 6, written: 6}
console.log(u8) // Uint8Array(6) [108, 105, 104, 111, 119, 101]
TextDecoder
将二进制数据解码为字符串
构造函数
const decoder = new TextDecoder([utfLabel], [options])utlLabel(string):编码格式, 默认UTF-8, 支持的编码格式列表可参考Encoding API Encodings | MDNoptions(object):fatal(boolean): 如果编码(.decode())失败是否抛出异常, 默认为false
方法
- decode([bufferSource], [options]): 将二进制数据解码为字符串
例子
const decoder = new TextDecoder()
decoder.decode(new Uint8Array([108, 105, 104, 111, 119, 101])) // lihowe
总结